Wednesday, March 24, 2010

4 KW Solar Electric

We have begun an exciting new project, a 4kw Solar Electric system. It is being installed by the capable team from Clean and Green Alternatives.  It is our hope that this system will have the same effect on our electric bill as our Reynolds Solar Hot Water system has had on our propane bill.  Our system presented some challenges to Clean and Green. Our roofs were not suitable and I did not want to use valuable orchard and garden space for solar panels. Neither did I want the panels blocking any of our rural scenery.  Therefore I had them squeeze the system behind our garage and put it on tall poles to avoid any shadows.  This changed the engineering requirements dramatically, requiring much stronger poles and a whopping 4 yards of concrete, poured into 3 foot diameter foundations.
This required a large concrete truck.  Too large to get behind the garage. Therefore, a mud buggy was required, too.
It took about 9 trips to transfer all the concrete to the worksite. A little over a yard went into each of the 3 foundations supporting the nearly 1,000 pound support structure.


 The support, ready for panel installation:

The panels, waiting for installation:
Sixteen 280 Watt Grape Solar panels.

The panels went up in less than a day. It is an attractive and nicely engineered system.  There is 330 square feet of panel area.  The combined weight of the panels is 890 pounds and the racking is around 300. The poles add a few hundred pounds more, and they are set in 16,000 pounds of concrete.  It becomes easy to see why these systems remain expensive.
  The inverter, a PV Powered 4800 Watt, is a solidly made unit which can produce power even when the panel output is very low.  I've observed it making as few as 50 watts before shutting down as dusk.


True, 50 watts is insignificant. But the system's low light efficiency pays off on a cloudy and foggy day like today. The system produced on average 400 watts under a solid overcast, and 4kwh for the day.  That alone would be enough to reduce our electric bill by 10%.  But of course a solid month of rain would be rare, and in normal weather the system should produce 500kwh/mo.
Update:
The early results are encouraging.  The system has been running 3 weeks through a variety of weather conditions. It has averaged 19kwh/day, which equates to 570kwh/month.  That should result in us having  electric bills near zero for 2 - 3 months each year and substantially reduced ones for the remainder.
PV Powered has a great website which monitors the inverter and records the output. You can then download a variety of performance data, like the chart on right.  It also monitors for any problems that might develop.
As we accumulate more data, I will update the results here.  Update.  I increased the size of the system, click  here to see it.

Saturday, March 13, 2010

1965 PHILCO "Florida" Heat Pump

Ok,.so.what makes a Philco heat pump Blogworthy? For one, it is a Genuine Philco, and I love all things Philco.  Second, it is one of the earliest examples of a residential heat pump you will find anywhere. Third, it is approximately 45 years old and still runs great.

I'll admit the age is a guess.  It was made after Ford's acquisition of Philco in 1961, but before Philco was renamed Philco-Ford Corp in 1966.

Whether it was 1962 or 1966, it is a remarkable achievement in longevity and reliability by a very well-engineered Philco product.

I acquired it about 14 years ago from friends who bought an old house which included the Philco. They used it until it quit from a failed capacitor, a $6 part.  Knowing my affinity for Philcos, they gave it to me. It sat in my garage for 12 years, patiently waiting for the day when it would once again pump heat.  That day finally came with the completion of my workshop.  After a thorough cleaning and replacement of the capacitor, the compressor rumbled to life after it's Rip Van Winkle slumber. Soon, it was pumping out 9500 BTU's of cold air.  Back then there was no such thing as EER ratings, but it calculates out to 6.1, typical of the era.  I'm not sure how to calculate efficiency as a heat pump, but it is very effective above 40 degrees F and OK as low as 32 F.  In both modes, it effectively conditions my 576 square foot workshop.
  The heat pump is hardly more complicated than a conventional air-conditioner.  There is one solenoid valve to reverse the Freon flow, and that's about it.  Apparently by design, the solenoid releases all pressure (with an audible hiss) when the thermostat cycles in heat mode. this appears to be necessary, for the thermostat cycles more frequently than it does in cooling mode.   Those who were interested enough to read this far may be interested in another unique design attribute. The airflow,  both on the evaporator and condenser sides, is reversed from the norm.  Inside, the fan pushes through the evaporator, which is tilted back instead of vertical. This insures that condensation does not dribble out the front.  Outside, the fan draws through the condenser and then blows the warm (and potentially moist) air over the compressor. At first I thought that somehow the fan was spinning backwards, but that is how it was meant to run.  And, after 45+ years of dependable operation, who am I to question Philco's engineering?
All in all, a nice design that was apparently ahead of it's time, for heat pumps did not become popular for several more years.

Update:   It is now in it's third year of operation in my workshop, and continues to do a fine job.  The great heatwave of Summer 2011 has made working outdoors unbearable.  Yet even with 100 degree temperatures outside, it was a comfortable 78 degrees inside. A good performance, considering the workshop is a steel sided garage with only one inch of foam insulation, and was baking under intense sunshine all day.

Friday, March 12, 2010

Oil-Fired Power Plant Simulator

How to build an electrical power generating plant simulator, or Having Fun with Op-Amps.

    Way back in the late 1970's, I attended one of the premier technical schools in the country, The Williamson Free School of Mechanical Trades.
 Enrolled in the Power Plant program, we obtained "real-world" experience by generating our own electricity using a Babcock and Wilcox boiler, a 200kw steam turbine, and 150kw Detroit Diesel generators.  While the associated classroom theory was invaluable, there is no substitute for hands-on learning, and the responsibility of keeping the lights lit for the entire campus.  Allow a blackout to happen, and the feedback from classmates and instructors (who mostly lived on campus) was immediate.  Sadly, rising energy costs brought to an end the 90 year tradition of being off-grid shortly after I graduated.
    In my junior year, Omnidata, a company in the business of making sophisticated simulators to train power plant operators loaned us one for a brief period.  That inspired a classmate and I to build one for our Senior Project, which is Williamson's version of a Thesis.
    The microprocessor had been invented only a few years before and the first low cost computers, like the Sinclair ZX81, would arrive a few years too late.   That left a technology that is under-appreciated today, analog circuitry and versatile IC's like the Operational Amplifier, or Op-Amp.  These were relatively inexpensive and easy to use.  A thin book covering the basic Op-Amp circuits was all we needed to get started.  The Op-Amp got it's name from the fact that it does mathematical operations: Addition, Subtraction, Multiplication, Integration, and others.  But these were all we needed, along with a simple digital function, known as a Comparator.  This simply gave a Yes or No answer as to whether the voltage it was monitoring was above or below a certain value.
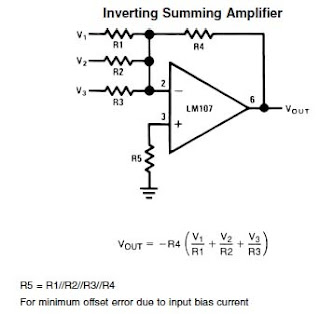

Addition: Input Voltages 1, 2, & 3 are added    together.   Equal resistor values gave each input equal weight, which is how we used them.  A good deal of the Op-Amp's versatility came from the fact that it could accept both positive or negative voltages, which would subtract.  Another way to achieve subtraction is to connect to pin 3.  This is the equivalent of changing the sign of the voltage.

See the Difference Amplifier at right:

V Out is the difference between V1 and V2.
Combining elements of the summing and difference amplifiers is possible, giving one the ability to add and subtract multiple input signals.

The heart of the simulator was the Integrator circuit:
This functioned as an analog "memory" in our simulator, with the voltages stored in the capacitors representing things like the water level and steam pressure in the boiler.

A positive voltage into the "Boiler" integrator represented adding water, while a negative voltage represented water leaving as steam.
Adjusting "Water" voltage to cancel out the "Steam" voltage caused the Boiler integrator to hold a constant level.

A nearly identical circuit represented the boiler's water source, known as a Deaerator, except that the polarity was reversed. That way, the same positive voltage that "filled" the  boiler, "emptied" the Deaerator.  In turn, the source for the Deaerator's water, known as a "Hot Well", was also an integrator with the polarity reversed.

Put elements of the Difference Amplifier,
Summing Amplifier, and Integrator together
and you have the basic elements of a simulated feedwater circuit.  Adjusting the resistor and capacitor values alters the system's response, making it possible to mimic the response of the real world system you are modeling.  No, it is not sophisticated enough to respond in a non-linear fashion to simulate filling a round vessel, but it is good enough for many instructional applications.

    In the real world, water level in a boiler is critical, and any power plant would be equipped with high and low alarms.
Too low a water level, and the boiler could blow up.  Not a good thing.  Too high a water level and the boiler will spit water out
along with the steam.  A very bad thing for a modern turbine, or even an antique steam locomotive.
  Therefore, we equipped our simulator with alarms, too.  Here, the simple comparator circuit was ideal.
When the input is below a set level, the comparator will flip to -15 volts. Above that, and it will flip to +15 volts.  The alarm level is easily set with a variable resistor:
We added additional comparators to shut down the boiler in case the operator did not respond correctly to the situation.
   There was also an annunciator which sounded when an alarm went off.  This could be silenced by the operator pressing a Reset button, but the light for that alarm would stay lit until the condition was corrected.  It sounds simple to do, but how does one allow the annunciator to sound for additional alarms?  To solve this, I made a crude "One Shot" circuit consisting of a capacitor and diode. Each time an alarm sounded, a pulse of current flowed into the capacitor, just enough to latch the annunciator's relay.  Every alarm needed one of these "One Shots", and there were about 20 alarms. The parts count was growing rapidly.


The boiler we were simulating had a 3 step startup sequence.  First, the blowers are started to purge any fumes out of the combustion chamber. Next, the ignition pilot is lit.  Finally, with the pilot burning, fuel oil is added.

  Here, we used an integrator as a timer.
The integrator slowly ramped up the voltage to the 3 comparators, turning them on in the proper sequence and with the correct time delay.

The boiler was fairly sophisticated,  with forced and induced draft fans, and an adjustable fuel/air ratio.  The student could alter the above and get the poor combustion and furnace pressure alarms to go off, or even have the boiler shut down. Also, manually starting the boiler was possible, provided the student turned the fans on in the right sequence.

While the circuit examples I have shown appear deceptively simple,  there were a lot of them, and many with customized tweaks.  In addition, there were circuits to allow the Simulator to run in full automatic.  The student could simply request more or less "Electricity" from the Simulator's  "Generator" and watch it run itself, with feedwater pumps automatically adjusting flow and the boiler maintaining the proper steam pressure.  The student could  then initiate a failure, say by shutting off water to the Hot Well and then watch watch the whole thing shut down in sequence as the feedwater system went dry.
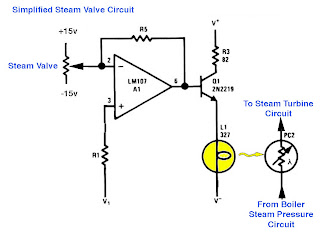
One circuit I was especially proud of was my steam valve. This one presented a problem in that there were two variables: the amount the valve was open and the pressure of the steam.  I wanted a valve with realistic operation and the tricks I used for the feedwater pumps wouldn't do.  I hit upon an idea that I thought was novel, using a combination of an ordinary lightbulb and a photoresistor. It worked great.  Interestingly, I found a similar circuit while looking for graphics for this blog.  See the Multiplier circuit below.  In their circuit, they used feedback to make the response linear.  I did not need that, in fact, the non-linear response of my circuit is more realistic.
However, as I recall, I found no such circuit back then and conceived of the idea on my own.

Add all of the circuits together and this is the result:
Impressive looking, isn't it?  Here is the final product.  Not a bad facsimile of the real thing:
There were some interesting experiences associated with building the Simulator.  We had the support of our instructor, who lined up technical advisers for us. One in particular was most helpful, but somewhat skeptical, for he was in the business of building customized professional simulators that matched a customer's real equipment precisely.   I'm not sure if he appreciated our simplified approach.  However, while he had behind the scenes sophistication,  we had great graphics and lots of blinking lights.  If there is one thing that impresses non-technical types, it is lots of blinking lights. Of course, our lights were not there just to dazzle, they provided the vital alarm indications.
   Our return trip with the nearly complete simulator was humorous, thanks to those blinking lights and great graphics. The humor was provided by our adviser's non-technical supervisor, who actually said to him "Why can't we make one like that?"  Poor fellow.  He was working with the latest in digital technology, programming in every system detail, while we had very rudimentary analog circuits lurking behind a panel with lots if blinking lights.  It made us feel good, however. And, our simulator looked great, don't you agree?
Epilogue:  The Simulator ran reliably for over 10 years as a teaching aid at Williamson.  Then one year, some students who did not bother to read the instruction book decided the Simulator was broken, when in reality they were not following the proper start-up sequence. I made the mistake of leaving a copy of the schematic so that students interested in electronics could understand it's operation.  Unfortunately, they used the schematic to try to "fix" it, and made a real mess.  I took it home, and tried to sort things out. Internally, it was a rat's nest of point-to-point wiring, a giant breadboard.  That was a good way for us to develop the circuits in a hurry, but having someone else go in there and cut wires made it impossible to fix.  In the end, that type of simulator's days were numbered anyway.  Programmable computer controls were fast replacing the traditional controls that the simulator represented.  Time and technology marches on.


Friday, March 5, 2010

More Motorific

Christmas 1964

Since I have Motorific on my mind, I'll explain some of the accessories I have.    One thing to keep in mind is that I am not a collector.  Rather, these are all my personal  childhood toys that I played with and still have, 45 years later. What you are seeing here are not toys with an anonymous history; bought and sold at auctions until their past has been completely erased, but toys with a story behind them. 
Steering Test: The early small sets came with two sections of these, and one sign.  The signs were very unstable and tipped easily, so I rarely used them.  The early cars did not have steerable wheels, so there was lots of tire scrubbing on these zig-zags.  The later cars finally received steerable wheels, a big improvement.

Shock Absorber Test: 
The starter sets came with 2 of these also, along with 2 switches.  That was my first set. These simple humps were among the most unreliable of accessories. The car's guide pin barely stayed in the groove and sometimes the car left the track. In that case, I guess you could say the car failed the test!
That set was probably a birthday present. For Christmas 1964, I received one of the larger sets, a Giant.Detroit.
It included the exciting Split Bridge: Not too exciting in reality, as the cars reliably made the jump. But it was fun, anyway.


Also included was the traumatic Spring Test: Cars traveling the other direction breathed a sigh of relief as they went around the horrendous precipice. It is interesting to look at the picture of the box today, so many years later.  Notice how the illustrations show the cars making flying leaps. In reality, they flopped instead, like in my photo. Modern day truth in advertising laws would not permit such exaggerations.
For some real 1960's era fun, you ran multiple cars and had them either crash into each other, or miss by a split second on accessories like this.  For me, a lot of the fun was in designing new layouts, and then running the cars to see what they would do.  Since the track switches flipped automatically (most of the time) each time a car passed, the results were unpredictable.


The Crash Test was OK.  Not great, but better than nothing. Car plowed through a "brick wall", which re-closed with the help of rubber bands.


The Cornering Test was a birthday present, as I recall
 I was given a few $$$ for accessories and my mom, brother and I went to the toy store.  My brother wanted me to get a set of trestles to make elevated sections of roadway. I should have listened to him.  Instead, I chose the cornering test and the rather useless


Horsepower Test.  This simply wasted time and batteries as it held the car until the "Dynamo-meter"  completed one revolution.

 Perhaps it was too little, too late, but things got more interesting in Motorific's autumn years.  I bought a couple Racerific sets off the discount rack. (The same place I bought the crown jewel of the collection, the Tractor Trailer)  These sets perhaps were inspired by the Addam's Family's train set, for there were lots of designed in accidents waiting to happen. Like the Breakaway Bridge:  As I recall, I often taped it together and used it as a normal bridge.

Then there was the wooden road with loose board. About every 6th trip over the board, it would release and a strong spring would fling the car a lot farther than this!
This worked in only one direction.


The "Speed Up" guy and Rally Flag: The Racerific sets came with a clever two speed car.  Two small gear change levers under the car were activated by the the Speed Up guy, who's function is self-explanatory. There was a "Stick Shift" connected to the Speed Up guy via a cable, allowing you select whether the car actually sped up.  The Speed Up Guy did not move, but the car ignored him. Must have been very frustrating for the poor little guy. The spring loaded Rally Flag popped up when a car passed in either direction. The speed up guy worked in both directions, too. Lower Right: The Shifter and cable pass through under the Rally Flag.  The only track section I'm aware of with such a feature.

 The car shifted into low gear when it was traumatized by the sight of the Smashed Jaguar and the ensuing Oil Slick.  That raised portion in the track which contacted the car's downshift lever might have had something to do with it, too. The car only slowed when traveling in this direction.
Then there was the Hairpin Turn.  A great battery tester.  As these cars had no differential, tight turns meant lots of tire scrubbing. Hard on the batteries. Back in the stone ages, before the Energizer Bunny (or B.E., as it is known) the primitive carbon zinc batteries lasted maybe an hour. Short battery life probably contributed to the extinction of the species Motorificus, which was supplanted by the rapidly evolving Hot Wheelsicus.
A great, if unofficial, accessory was the Pouncing Cat.  Sample shown on the left.  Styles and cat behavior will vary. Our cat would hide under the furniture in our living room and wait for the car to pass nearby.  Typically, we would see just a lightning fast cat's paw appear, and not the whole cat. After swatting the car, the cat's paw would retract and wait for the next victim.  The cat shown here is my pal Angel.  At 18, she is old for a cat, but too young to remember the glory days of Motorifics.

Finally, the Rally Timer with Lap Counter:
A simple, and noisy, mechanical clock.  Pressing lever released the car and started timer.
Next:  Action Highway accessories.
 The Remote Control Intersection:
Came with some truck sets, like my Action Highway 101, or as a separate accessory.  When purchased separately, it came with adapter tracks to connect it to regular car sets. Originally, these tracks had posts to prevent trucks from entering, because truck tires left the track on curves.  I cut the posts off so I could use some straight car track to stretch my truck layout.
Photo on left:  Car has green light (actually a green sticker on a mechanical stoplight).  Truck is held by a stop in the pin groove.

Change the light using the remote control and the truck crosses the intersection.  Note where black road paint is worn off by the spinning wheels of stopped vehicles.  As the remote control normally gave the lane the truck is in a red light, the paint is worn much more there. 
These made in Hong Kong sets were otherwise very American.  Note the statue of George Washington, and other American references - sets named Detroit and Dearborn, and predominately American cars. A few classic European sports cars were added in: British Triumphs and Jaguars, German Mercedes and Italian Ferraris. Japanese cars were unheard of back then, both in these sets, and on real roads.
The.Remote Control was standard with the intersection and was essential, for the intersection did not flip automatically like switch-tracks do.
Inside the remote was a little balloon which was expanded when the remote plunger was pushed down. It worked well and could be bought as an accessory to add to any switch-track.
The Mystery Warehouse came with the Action Hwy 101 set. The "mystery" part came from the fact that the car or truck (Tractor-Trailers not Permitted - see sign on warehouse) turned around inside in a seemingly impossibly small space.  Here is the mystery demystified:
A series of ridges in the track helped skid the rear wheels of the vehicle around the otherwise impossible turn. A raised post in the center also helped guide the vehicle. 
The roof and walls of the warehouse are in good condition, for 41 year old cardboard.
 
Road Under Construction: Another "101" accessory. Vehicle wheels moved magnet under flagman until he crossed the road.  Then car was released to continue.  Worked only in this direction.
Passing Lane:
A very useful accessory, again part of the"101" set. Cars went to the side, while truck's wheels dropped into channels, which lowered truck's guide pin to a deeper groove, keeping it in the truck lane.
The Evolution of the Switch:
Early Motorific switches on left, later Racerific, on right. The early ones had tighter radiuses (the tight turn in the Y switch was especially bad), and the movable center portion occasionally caused the cars to get stuck.  Improved versions on right. Larger radiusus and a more jam resistant design.

The End of the Line: In 1972, the last of the Motorific inventory was liquidated through Radio Shack and perhaps other stores. They were packed in simple cardboard boxes, unlike the more elaborate packaging from their golden age.
 
The Motorific era lasted a scant 8 years, the Ideal Toy Company, 75.